bonocomet
Blue Crack Distributor
The Night & Day video on DVD comes out tomorrow!!!! 


In my post on page 6.Dahlia said:In which gif are Larry and Edge dancing??I can't find it atm

 but good excuse to go download it)
bono_212 said:Repeats the question just asked
and also I have request for
Silly walk by bono and edge
Evil bono (don't have the elevation videobut good excuse to go download it)


A very detailed guide to making mini-movie icons.
I love making these, and a lot of this stuff I've had to teach myself, because there's not really that many tutorials floating around. So I thought why not make one. The opportunity came today while I was making one. I basically kept notepad open and wrote down everything I was doing.
This tutorial was written for use with PaintShop Pro 7 and Animation Shop 3, though I'm sure it could easily be adapted to other programs.
First you need your screencaps. There are a number of ways to go about this. The easiest way is to use a program that automatically takes screencaps for you. VirtualDub is a free, easy-to-use program that you can download here . You can find a tutorial on how to use it for screencapping here.
However, VirtualDub only takes screencaps from video files on your computer. You can't use it to take screencaps from a DVD. PowerDVD allows screencapping from a DVD. You can download a thirty day trial here. Your computer may already have PowerDVD 5.1 installed. Mine did, but it was a really weird program made for tech-phobes, and wouldn't do what I wanted it to. So I had to upgrade to PowerDVD 6.
In PowerDVD, right click on the video, and click Configuration. In the Configuration window, click the Capture tab and select Capture To File. Select the folder you want the frames to go to.
When you get to the point in the video from which you want to take your screencaps. Right-click and click Forward > 1/2x. This plays the video at half speed. While the bit you want to capture is playing. Hold down the C key on your keyboard. Afterward, look in the folder you specified earlier, and you should find all of your screencaps.
(Note: The best clips for mini-movie icons are short, clear, single shot, single angle, clips. You can make mini-movie icons from multi-shot scenes, but it's trickier to pull off)
Now, once you have your screencaps, from whichever program you used, you'll want to open them all in Animation Shop. The easiest way to do this is to use the Animation Wizard. When you get to the Add Image screen, highlight all of the images, to add them all in at once. Make sure they're in the right order before clicking Next.
Once your images are open, look at them and get rid of any excess frames that you don't need at the beginning or end. Select all of the frames (Edit > Select All). Now you'll want to get rid of a lot of the ones inbetween. Click Animation > Cull Animation, and get rid of either every other frame, or every third frame, or even more. You be the judge. You can always get rid of more later if it's not enough.
Once this is done, select all of the frames and export them to PSP (File > Export Frames > To Paint Shop Pro).
Now, in PSP, take a look at your frames. In my case, all of the action in the scene was happening in the very center, with a lot of boring empty space around the sides. This means it's time to crop.
When cropping frames for mini-movie icons, the important thing is to make sure each frame is cropped in the same spot so that the animation doesn't wobble around.
I taught myself a little trick for this.
When you export the frames, PSP opens them all in one images, as different layers. Starting at the top layer (which is the last frame), use your rectangular selection tool to draw a selection around the part you wish to keep.
Hide the layer. On the next layer, if you need to expand the selection any, do so. Then hide that layer. Keep doing this until you're down to the bottom layer.
Example image, showing the process.. sort of.
You can also crop the frames in odd shapes (circles or whatnot) and even feather them so that the animated area fades into the background (like I did here). Just make sure every frame is cropped and faded in the same places.
Now, click Image > Crop To Selection.
Next you need to resize the image. The animation in a mini-movie icon should take up around a quarter of the overall icon size. Your image is probably not a perfect square. In the resize window, whichever number is smaller in the pixel measurement should be brought down to about 50, give or take a couple of pixels.
Now, when things get resized, sometimes they get fuzzy. If you wish to, go ahead and sharpen all of the frames.
Now it's time to start turning it into an icon.
You'll want to expand the canvas to 100 x 100 pixels (Image > Canvas Size). But you want to make sure that your animation box gets positioned correctly. So before you expand the canvas, decide where you want to put the animation box within the base. If you want to play with it, open a new 100 x 100 image, and copy and paste one of the frames onto it. Move it around on the blank canvas and decide where you want it, keeping in mind leaving room for borders and text.
Now, expand the canvas. Set the demensions at the top to 100 x 100. Be sure to set the image placement (at the bottom) to what you want. In my case, I want it 7 pixels from the right, and 15 from the bottom.
Tada!
At this point, save the image as a PSP file and close it. Close it in Animation Shop as well. (This is necessary to break the link between the two).
Now reopen it, and begin creating your base.
Don't make your base too terribly fancy, as it will detract from the rest of the animation, and just make the filesize bigger. You'll want new layers at the bottom for the background, and at the top for the text.
Once you've finished your base. Save again as a PSP file.
My finished base
Now the hard part comes. You have to open all of those frames back up in Animation Shop and animate them.
In PSP, hide all of the frame layers except the very first one. Now copy and paste as a new animation in Animation Shop. To copy all of the visible frames at once in PSP, click Edit > Copy Merged (or Ctrl + Shift + C).
Then, in PSP, make the second frame visible, and copy merge it into AS after the first frame (Edit > Paste > After current frame or Ctrl + Shift + L).
Keep uncovering your frames and copying and pasting them into AS until you have all of them.
Once all of your frames are together in the right order, you'll want to adjust the frame rate. Select all of the frames, and then go to Animation > Frame Properties. The speed of a mini-movie icon makes or breaks it. You don't want it to be too fast.
If you've set the frame rate pretty fast, and the animation is still too slow, it means you have too many frames. Get rid of some of the ones in-between.
Another thing to keep in mind, if your frame rate is extremely fast (less than 5 or 6 100ths of a second) it may slow down once uploaded to the internet, as browsers won't be able to play it at as high speeds as Animation Shop can. If you have this problem. Make it slower, and get rid of some frames to make it the right speed.
Next you want to decide how you want to make your animation start and end. You can leave it as is, so that it just loops on itself, all at the same speed. You can have the last frame fade to black (or white) and back into the first frame (I usually don't do fades, because it just adds more frames). Or you can have the first or last frame (or both) pause for a moment, before the animation loops.
Now comes the part that will give you a HUGE headache. LiveJournal has a filesize limit of 40k for icons. It can be extremely annoying to have to keep messing with your icon to get it below 40k. The best ways to lower the filesize of a mini-movie icon is by getting rid of some of the frames (be sure to adjust the frame rate accordingly) and to lower the amount of colours used (which you can do through the Optimization Wizard).
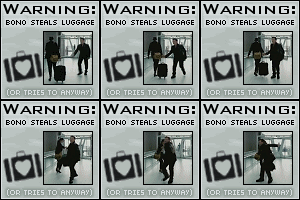
Finished Product:

(It originally had 37 frames, but I cut it down to 17 to get it under 40k)


 well...this is the best I could do...it just wouldn't work the way I wanted it to
Originally posted by bono_212
well...this is the best I could do...it just wouldn't work the way I wanted it to
[/B]

bono_212 said:The problem was that Edge's bit happens so fast I couldn't screen capit.....in retrospect, I guess I could watch it in slowmo...duh...I'll make it tomorrow
until then enjoy a little coexisting
(i'm gonna work on making this one smaller to make it my sig...bye bye last.fm)

 he really made a nice blooper there!
 Galeongirl said:
he really made a nice blooper there!
also, I have the Elevation vid, but it's crap quality... I do have beter quality but it's in the Elevation documentary, and it's too big for YSI... so I have to upload it with a random site, and it takes ages... tell me wich you'd like best
bonocomet said:
What was the blooper?
Oh wait, do you mean where he's pointing while he says it? And is that from Chicago dvd?

 <--- Bono pulls funny face...
u2granny said:
U2Girl1978 said:
U2Granny, may I use this one?
DreamOutLoud13 said:I did make a tutorial a while ago (using the Bono-luggage-thief icon as an example). I'll crosspost it here for the sake of ease, if no one minds:
DreamOutLoud13 said:
 with these gifs! The Stay video....
 Great job!

 *cracks whip*