A question for those of you who have made t-shirts

The friendliest place on the web for anyone that follows U2.
If you have answers, please help by responding to the unanswered posts.

madonna's child

Rock n' Roll Doggie VIP PASS
Joined
May 23, 2001
Messages
5,567
Location
NYC
How exactly do you do make the t-shirt?

In school, we made t-shirt designs in my art class and printed them out on t-shirt paper. But my teacher never explained how to make the shirt. I assume you iron on the design, but is there anything special I should know? Do I cut out my design or iron the entire sheet? Do I put a towel between the paper and the iron? How long does it sit before I remove the paper? How long before I can wear the shirt?

Help!!!
 
I made a t-shirt with my website logo on it. It was really easy (and fun!). Kodak has these kits that you can get where you print off your design on this special paper and then iron it on your shirt. It doesn't take long at all. Hope that helps.
 
Well, I have the paper and the design is already printed on it. My question is ironing. Could you explain the directions for ironing it on? Do you just iron? Is there anything special?
 
you have totally come to the right place.


ok...so you have it all ready to go, right?

  1. cut the design about 1/4 of an inch on the outside (so you aren't using the whole page, unless your design is that big)
  2. warm up yer iron, set it on cotton, it needs to be at the hottest setting.
  3. make sure that if you have any words on there you have reversed the image, else your shirt will have to be read backwards.
  4. place the design where you want it on your shirt, face down, so the design is on the t-shirt.
  5. put a cloth between the design and the iron...nothing too thick, but not too thin. should be the consistancy of a nice t-shirt.
  6. put your iron in the middle and move it slowly in circles going outward.
  7. for every 2 inches you should spend about 2 minutes on it with the iron (not at the same time. if your design is 5 inches, cirlce around for 10 minutes, get my drift?)
  8. after you're done ironing, take the cloth off and let the design cool completely. this will take about 10-15 minutes. the cooler it gets the longer your design will last.
  9. after it is completely cooled, slowly peel off the paper starting in one corner.
    [/list=1]


    lemme know if you need more help.
 
Lilly said:
you have totally come to the right place.


ok...so you have it all ready to go, right?

  1. cut the design about 1/4 of an inch on the outside (so you aren't using the whole page, unless your design is that big)
  2. warm up yer iron, set it on cotton, it needs to be at the hottest setting.
  3. make sure that if you have any words on there you have reversed the image, else your shirt will have to be read backwards.
  4. place the design where you want it on your shirt, face down, so the design is on the t-shirt.
  5. put a cloth between the design and the iron...nothing too thick, but not too thin. should be the consistancy of a nice t-shirt.
  6. put your iron in the middle and move it slowly in circles going outward.
  7. for every 2 inches you should spend about 2 minutes on it with the iron (not at the same time. if your design is 5 inches, cirlce around for 10 minutes, get my drift?)
  8. after you're done ironing, take the cloth off and let the design cool completely. this will take about 10-15 minutes. the cooler it gets the longer your design will last.
  9. after it is completely cooled, slowly peel off the paper starting in one corner.
    [/list=1]


    lemme know if you need more help.


  1. :yes: That's what I did too! :up:
 
[color=royal blue]YAAYYY Fer Tshirt making. You got yerself a good set of instructions there.

Just remember to peel away the backing before you start to iron. I tried to iron Eurotrash Bono on a shirt and forget to take off the backing and fooked it up so bad :mad:
[/color]
 
MonaVox said:
[color=royal blue]YAAYYY Fer Tshirt making. You got yerself a good set of instructions there.

Just remember to peel away the backing before you start to iron. I tried to iron Eurotrash Bono on a shirt and forget to take off the backing and fooked it up so bad :mad:
[/color]

I did that, too... I managed to salvage the picture - it made the back picture look "antique."

OK, here's my number one all-important question for you:

What color is your t-shirt?

The reason I ask is because if you're printing on a white colored t-shirt, everything is fine. It's when you get into colors other than white that problems arise.

Printers don't print white ink - it's automatically assumed you're going to print something out on white paper, so whatever white you see on your printed image, it's just white paper showing through. My students found this out when they thought they could print white words onto dark-colored paper. Nothing showed up.

Anyhow. If you are going to iron on an image on dark-colored fabric, you'll need to find iron-on transfers for DARK colored fabrics. They are different in that the iron-on transfer is printed on a white iron-on doo-hickey and you just cut out the image you want, peel away the backing and place the iron-on transfer where you want it on the shirt. The kit provides pieces of wax paper to place over the image and you just iron it on with hard, firm strokes (this is sounding a bit er, risque... sorry)

Also, make sure your iron doesn't have any water in it when you are ironing the transfer. You can't use steam - it will mess up the image if you do.

I think that about covers it. I've made several t-shirts - ask Disco and anyone who saw me at Vegas or LA3 - I was a freakin' walking billboard (that's what Marina (mbi16) called me. :D I love making shirts. I just finished a powerpuff girls shirt - with Bubbles playing the drooms and I added rhinestones to it. Woo hoo! :D

Moonie :D
 
Thanks girls, that is exactly the info I need.

I'll post a pic of me in my shirt, when it's done!
 
hey guys, i bought some iron on transfer paper, and while on the subject, do you guys want to give me ideas of shirts to make? i've got enough for 3.......................help me out!

:D
 
Stories for Boys said:
hey guys, i bought some iron on transfer paper, and while on the subject, do you guys want to give me ideas of shirts to make? i've got enough for 3.......................help me out!

:D

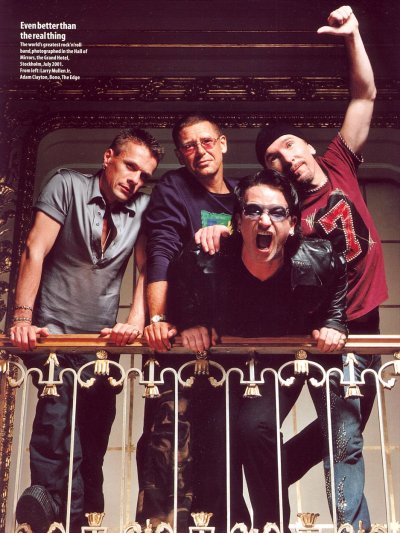
Well, your possibilities are endless, really. It all depends on what you want to be on your chest. heh. I was so embarrassed about having Larry's picture on my chest during the 3rd leg of the Elevation tour that I put him on my back. I didn't want to take the chance of meeting him and having his picture emblazoned across my chest in all its glory (my er, boobs included). So, I put the picture of the band that was taken in Stockholm at the Hall of Mirrors on my chest and a picture of Larry taken from the U2 Elevation poster on my back. I then put a shitload of rhinestones all around the pictures and words and, well, hence the nickname Marina penned... Moonie's a Walking Billboard! :D

I have several U2 shirts. I have the original one I made of Larry from the Paiste Cymbals poster... unfortunately, I wore it to Disneyland while it was raining and a bit of the transfer came off at the top of the picture. It actually looks pretty cool that way - gives it a bit of an "old" shirt feel. It's been through several washings and has held up fine.

Make sure you choose a picture that has a high resolution - if you choose a picture you like and it's small, if you try to make it bigger, you'll see the pixels when you print it out and the picture will end up looking blurry.

Hmmm... you like Bono, eh? there's sooooo many options. :D Pick something that might be a bit different. I have people asking me all the time who's on my shirt. :D

Hope this helps.

Moonie :D
 
actually, i'm more partial to adam and edge (i just like that avatar pic)......i was thinking of making a more group shirt though, cause i'm not really that decided on which one i "like" more........*ponders*.........
 
Stories for Boys said:
actually, i'm more partial to adam and edge (i just like that avatar pic)......i was thinking of making a more group shirt though, cause i'm not really that decided on which one i "like" more........*ponders*.........

I forgot to mention something....

I've found that if you copy and paste your picture into Microsoft Word, it's really easy to size the pictures and put them where you want on the page. You just have to make sure you format the picture, or else it won't let you move it around. This way, if you wanted, you could put four different small pictures together and it would cut out as one iron-on... much easier to iron and all. :D

I'm just a wealth of info, huh. :D

this is the picture that I put on my shirt for the Elevation shows:
 

Attachments

  • u2 - hall of mirrors - stockholm.jpg
    u2 - hall of mirrors - stockholm.jpg
    233.6 KB · Views: 50
Okay...I don't actually have any shirts yet, but I have one waiting to be made and maybe some more :) I need some new clothes for school :)

Anywho...I want to know about washing the shirts...what's the best way and what keeps the design around the longest?
 
I have... like.. a whole bunch of U2 shirts
I'd read the directions on the transfer paper you're using - it's different depending on what you get. Like.. Mona said to make sure to peel off the backing? I've used paper where you're not supposed to.
Anyway, also, after I wash/dry them I put a piece of paper over the design and re-iron it
and dude make sure you don't put it on a ribbed shirt cos I have a few of those and I wasn't thinking and they're not working too well
anyway
 
Okay, I think it's WAY past time for these to be reposted ;)

Some shirt ideas...

33486%3B7523232%7Ffp5%3Enu%3D3235%3E746%3E353%3Ewsnrcg%3D3232393%3A%3A2797nu0mrj

33486%3B7523232%7Ffp5%3Enu%3D3235%3E746%3E353%3Ewsnrcg%3D3232393%3A%3B4987nu0mrj

33486%3B7523232%7Ffp5%3Enu%3D3235%3E746%3E353%3Ewsnrcg%3D3232393%3A%3B4989nu0mrj

33486%3B7523232%7Ffp5%3Enu%3D3235%3E746%3E353%3Ewsnrcg%3D3232393%3A%3B498%3Bnu0mrj

33486%3B7523232%7Ffp5%3Enu%3D3235%3E746%3E353%3Ewsnrcg%3D3232393%3A%3C4%3B25nu0mrj
 
Back
Top Bottom